I have read every single word you have posted.Gained knowledge(even though I am kinda fab stupid)and have been buiding my car for 6 months or so now.Its a Polaris 2011 xp 900. I have now been passed by new models and technology, yet I feel the need to finish this and do all of bitd next season.I don't have money,and only a few years experience in offroad(ADRA,HDRA,AVE,AND EVEN A SNORE RACE).I have read your post because I think its awesome how you are just simply straight forward.No sugar coating.So keep up the good reading .I will be at all bitd races next season. Look for the very poor guy with his wife,daughter, and co driver's wife and daughter as our pit support.You cant miss us, we will be the only team with an all girl pit crew, LOL. As we have been for 2 years now.
You are using an out of date browser. It may not display this or other websites correctly.
You should upgrade or use an alternative browser.
You should upgrade or use an alternative browser.
Cost of Winning: The Monster Mav Chronicles
- Thread starter badassmav
- Start date
badassmav
Well-Known Member
Ha ha! Tony, that's awesomeI have read every single word you have posted.Gained knowledge(even though I am kinda fab stupid)and have been buiding my car for 6 months or so now.Its a Polaris 2011 xp 900. I have now been passed by new models and technology, yet I feel the need to finish this and do all of bitd next season.I don't have money,and only a few years experience in offroad(ADRA,HDRA,AVE,AND EVEN A SNORE RACE).I have read your post because I think its awesome how you are just simply straight forward.No sugar coating.So keep up the good reading .I will be at all bitd races next season. Look for the very poor guy with his wife,daughter, and co driver's wife and daughter as our pit support.You cant miss us, we will be the only team with an all girl pit crew, LOL. As we have been for 2 years now.
") . Hang in there buddy. Don't sweat the other guys w/ the shiny new XP1K's all tricked out. In your family's eyes, your UTE is the baddest out there. That's all that really matters. I am happy to read that instead of bringing your beer buddies to the "man" event, that you and your co-driver choose top make it a family affair with the ladies. See people, that's what I mean by the family unit. I think it takes a sacrifice as far as a lot of ladies are concerned to rough it in the dirt for a couple of days, but yet there they are, supporting their men as they enjoy their livelihood together. This is hoping that the road you share together does not divide into two separate paths, but rather stays the course, until it reaches its happy end. Tony, if there is anything that I am able to offer, please ask.
. Hang in there buddy. Don't sweat the other guys w/ the shiny new XP1K's all tricked out. In your family's eyes, your UTE is the baddest out there. That's all that really matters. I am happy to read that instead of bringing your beer buddies to the "man" event, that you and your co-driver choose top make it a family affair with the ladies. See people, that's what I mean by the family unit. I think it takes a sacrifice as far as a lot of ladies are concerned to rough it in the dirt for a couple of days, but yet there they are, supporting their men as they enjoy their livelihood together. This is hoping that the road you share together does not divide into two separate paths, but rather stays the course, until it reaches its happy end. Tony, if there is anything that I am able to offer, please ask.badassmav
Well-Known Member
I owe you a beer. Or 10 Reid!! Thank you for your participation. It is welcomed and obviously well received!
 STOUT
STOUTAttachments


badassmav
Well-Known Member
Let the Repairs Begin!
Since our efforts in the Nevada desert back in August, things have been a blur, and I have only just begun the process of repairing the real race car that we have grown to love (or hate). This journal will be dedicated to that process until the point that its readiness for battle is realized.
I've been on it now for a little over a week, and after I make notes of the surface repairs, I will begin to identify the more heavily damaged areas and mend those wounds first. Another motor change lies ahead. No, the motor didn't suck silt or any more dirt than is acceptable. It's just the the simple fact that this is the grand daddy of all races. Our points title and reputation are on the line. Like the Baja 500, Polaris will be funding any and all quality teams that otherwise would not have raced, in order to stack the deck against us. By grand daddy, I mean nearly 1,200 miles of uncertainty. Due to the hurricane that pounded central and south America, none of us, including my Mexico hero Marc, knows what to expect when crossing terrain that was easily passable just weeks prior.
Here's a summary of the weeks ahead;
-Motor exchange, 1 week
-Standard race prep, 2 weeks
-Damage repair from V2R, 1 week
-Replace all components that are even slightly worn with new
The latter includes front and rear differentials, drive shafts, brake pedal assembly, master cylinder, all brake lines, alternator, all engine management sensors, axles, cv joints, wheel bearings, rod ends and uniballs. Well, you get the idea. The list goes on until there is no component that has not been replaced, tested, or serviced. This will be a race high in attrition, and finishing teams will be weary as they roll in around 9 or 10 p.m.
Marc still insists on driving the race solo. He's a mans man, and he has something to prove to the teams who have us in their crosshairs. That is that this is the season of the Monster Mav., and try as Polaris may, there will be no victory awaiting them at the checkers. I will hope to find time to do a little more clutch tuning, but that remains to be seen. Airdam Adam schooled me on his last visit, and I know I can get an additional 5-8 reliable mph over our last outing.
Enough confidence boasting for now. I wanted to show the process of repairing the roll cage damage that we suffered at V2R. Not enough time to indulge in descriptive postings, but enough time to share some progress shots. When is bed time tonight anyway?!
Since our efforts in the Nevada desert back in August, things have been a blur, and I have only just begun the process of repairing the real race car that we have grown to love (or hate). This journal will be dedicated to that process until the point that its readiness for battle is realized.
I've been on it now for a little over a week, and after I make notes of the surface repairs, I will begin to identify the more heavily damaged areas and mend those wounds first. Another motor change lies ahead. No, the motor didn't suck silt or any more dirt than is acceptable. It's just the the simple fact that this is the grand daddy of all races. Our points title and reputation are on the line. Like the Baja 500, Polaris will be funding any and all quality teams that otherwise would not have raced, in order to stack the deck against us. By grand daddy, I mean nearly 1,200 miles of uncertainty. Due to the hurricane that pounded central and south America, none of us, including my Mexico hero Marc, knows what to expect when crossing terrain that was easily passable just weeks prior.
Here's a summary of the weeks ahead;
-Motor exchange, 1 week
-Standard race prep, 2 weeks
-Damage repair from V2R, 1 week
-Replace all components that are even slightly worn with new
The latter includes front and rear differentials, drive shafts, brake pedal assembly, master cylinder, all brake lines, alternator, all engine management sensors, axles, cv joints, wheel bearings, rod ends and uniballs. Well, you get the idea. The list goes on until there is no component that has not been replaced, tested, or serviced. This will be a race high in attrition, and finishing teams will be weary as they roll in around 9 or 10 p.m.
Marc still insists on driving the race solo. He's a mans man, and he has something to prove to the teams who have us in their crosshairs. That is that this is the season of the Monster Mav., and try as Polaris may, there will be no victory awaiting them at the checkers. I will hope to find time to do a little more clutch tuning, but that remains to be seen. Airdam Adam schooled me on his last visit, and I know I can get an additional 5-8 reliable mph over our last outing.
Enough confidence boasting for now. I wanted to show the process of repairing the roll cage damage that we suffered at V2R. Not enough time to indulge in descriptive postings, but enough time to share some progress shots. When is bed time tonight
anyway?!Attachments
crazywatson
#13 - UTVUnderground Approved
Wow I thought for sure you had something up your sleeve since we haven't seen you work on the car. As always I'm pulling for you and would really like to see you wrap this championship up. Btw another hurricane on its way to hit mid peninsula.
badassmav
Well-Known Member
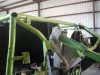
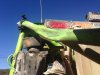
There are a couple of field pics earlier in this thread taken after the collision. We were not rolling when we were hit, and once hit, the TT and our car both lunged forward a minimum of 50'! Talk about close, check out the back side of Marc's seat.DAMN!!!!! Those pics of the cage make me cringe.I guess I was very fortunate with the little love tap I got at v2r.I cant imagine how that one felt. Just glad everyone is ok and getting ready to race again...
Attachments
badassmav
Well-Known Member
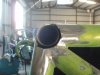
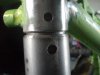
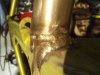
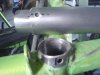
I finished the upper frame repairs a couple of days ago. The "B" pillar tube collapsed from the impact as well, so I cut it out, sleeved the joint, and welded the new section in. The sleeve serves three purposes.
-It acts as a back up for the weld,
-It provides a third structure for the weld to penetrate.
-It transfers the load at the weld seam into two areas, that at each end of the sleeve where the tubing is uninterrupted. Now, a hard impact that would have possibly fractured the butt weld, will be applied to a "seamless" portion of the tube structure. Notice the gap that I leave in between the seams where the two tubes join one another. Without a gap, the bevel alone would not be sufficient for the weld to thoroughly penetrate. Notice that the butt welds lay flat. That is a good sign that I achieved adequatwe penetration. I can grind the welds flush for aesthetic purposes, but I will most likely leave them, since this is no show car, and we only need to squeeze one more race out of the Monster Mav.
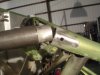
So, the process to position the sleeves in the vertical "B" pillar tubes a simple one. After cutting the damaged tube out, I clean the inside of the remaining tube burr free with a flapper wheel so that the inner sleeve slides freely into the tube. Don't let go, or the sleeve drops into oblivion! After confirming a clear fit, I put a small tack weld on the inside of the remaining tube at the depth I want my sleeve to fall to. I do the same for on the replacement tube. Then, I install the sleeve in the upper end of both joints, holding them up so they allow me clearance to slip the replacement tube in place. I do this with a prick punch through the holes I drilled for the rosette welds. Once the replacement tube is in position, I simply release the pressure on the prick punch and, wala! The sleeves fall into perfect positions, as decided by the depth of the tack welds I placed inside of the tubes earlier. Then, it's just a matter of tacking and welding the joint. I use a E 70S 6, .030" filler wire in a MIG welder.
I should add that, before cutting out the damaged portion of the "B" pillar tubing, I cut and wedged a spreader bar in between the horizontal door and roof bars to maintain the spread. The dimension between the two bars would surely have decreased by at least an 1/8 of an inch if I didn't.
The lesson here is: Always find a way to sleeve a butt joint when repairing or adding to an existing structure. It removes the transverse shear loads away from the weld joint, and onto the adjacent area, that area in which the sleeve terminates.
The impact from the crash shifted the lower portion of the frame a bit as well. Right at the pick up points for the rear control arms. I will not address this area through welding repairs because for one, it did not compromise the integrity of the frame and two, I designed my suspension with infinite adjustments so a four wheel alignment can always be achieved. This design was at the expense of a good amount of additional weight, perhaps 50 pounds or more, but I'm feeling pretty good about that right about now.
-It acts as a back up for the weld,
-It provides a third structure for the weld to penetrate.
-It transfers the load at the weld seam into two areas, that at each end of the sleeve where the tubing is uninterrupted. Now, a hard impact that would have possibly fractured the butt weld, will be applied to a "seamless" portion of the tube structure. Notice the gap that I leave in between the seams where the two tubes join one another. Without a gap, the bevel alone would not be sufficient for the weld to thoroughly penetrate. Notice that the butt welds lay flat. That is a good sign that I achieved adequatwe penetration. I can grind the welds flush for aesthetic purposes, but I will most likely leave them, since this is no show car, and we only need to squeeze one more race out of the Monster Mav.
So, the process to position the sleeves in the vertical "B" pillar tubes a simple one. After cutting the damaged tube out, I clean the inside of the remaining tube burr free with a flapper wheel so that the inner sleeve slides freely into the tube. Don't let go, or the sleeve drops into oblivion! After confirming a clear fit, I put a small tack weld on the inside of the remaining tube at the depth I want my sleeve to fall to. I do the same for on the replacement tube. Then, I install the sleeve in the upper end of both joints, holding them up so they allow me clearance to slip the replacement tube in place. I do this with a prick punch through the holes I drilled for the rosette welds. Once the replacement tube is in position, I simply release the pressure on the prick punch and, wala! The sleeves fall into perfect positions, as decided by the depth of the tack welds I placed inside of the tubes earlier. Then, it's just a matter of tacking and welding the joint. I use a E 70S 6, .030" filler wire in a MIG welder.
I should add that, before cutting out the damaged portion of the "B" pillar tubing, I cut and wedged a spreader bar in between the horizontal door and roof bars to maintain the spread. The dimension between the two bars would surely have decreased by at least an 1/8 of an inch if I didn't.
The lesson here is: Always find a way to sleeve a butt joint when repairing or adding to an existing structure. It removes the transverse shear loads away from the weld joint, and onto the adjacent area, that area in which the sleeve terminates.
The impact from the crash shifted the lower portion of the frame a bit as well. Right at the pick up points for the rear control arms. I will not address this area through welding repairs because for one, it did not compromise the integrity of the frame and two, I designed my suspension with infinite adjustments so a four wheel alignment can always be achieved. This design was at the expense of a good amount of additional weight, perhaps 50 pounds or more, but I'm feeling pretty good about that right about now.
Attachments
badassmav
Well-Known Member
Thanks Mike. I'm glad you are finding my thread interesting enough to Jew the time away from your employer to read it! I don't think that you have been up to Marc's shop yet. If you want to stop on by, anytime, let me know and I'll PM you his address. Or, if you just want to be adventurous and drive up, we're across from the post office. Say hi to Sheryl, and I hope your daughters are making you proud. (or at least not pissing you off!). Don't sweat the time of day. I keep long hours here, as you probably already figured out.Hey Reid,
Keep up the good work. I enjoy reading along,especially at work. Say Hi to Rick for me. We will have to meet up for a cold one soon.
Mike
Wonder how much weight you could've saved on the cage build by going with all TIG welded joints? From my experience in refineries/chemical plants/ power houses mig isn't greatly relied on, well as far as field welding. It's takes too much preparation and if there is the slightest bit of contamination it's hard to see the porosity until it's too late and then you have a lot of grinding. Also it doesn't have as much dig capability.
Question-
As far as I was told, you can use Inconel 625 when you are TIG welding 4130 and because of the Inconel weld properties it doesn't need to be stress relieved. I am in the field right now with no access to our welding engineer, but it was just a thought. I have access to the wire for free so I am not sure what it costs per pound.
Still love the thread!!!
badassmav
Well-Known Member
It sounds like the post weld attributes of the 625 filler falls into the "too good to be true" category. Even though the composition of the 625 filler is similar to 4130 (i.e., chromium and molybdenum), and the post weld ductility of the filler metal is good, the area adjacent to the heat affected zone is still 4130. 4130 is an air hardening steel, and when the temperature exceeds the "critical Temperature", then allowed to "quench" in the ambient temperature of the surrounding air, the grain structue increases in size, causing the parent material adjacent to the filler rod to become brittle. No filler rod can protect the superheated metal adjacent to the weld from nitrides and other bad stuff in the air.Wonder how much weight you could've saved on the cage build by going with all TIG welded joints? From my experience in refineries/chemical plants/ power houses mig isn't greatly relied on, well as far as field welding. It's takes too much preparation and if there is the slightest bit of contamination it's hard to see the porosity until it's too late and then you have a lot of grinding. Also it doesn't have as much dig capability.
Question-
As far as I was told, you can use Inconel 625 when you are TIG welding 4130 and because of the Inconel weld properties it doesn't need to be stress relieved. I am in the field right now with no access to our welding engineer, but it was just a thought. I have access to the wire for free so I am not sure what it costs per pound.
Still love the thread!!!
You are correct in that TIG welding is a more controlled, and therefore, a better method of joining 4130 materials together. The fact that a high percentage off road fabricators are building from chro-moly, and not stress relieving their weldments, is indicative of two things. One, they are not properly educated in regards to the metallurgy behind 4130, and two, their parts are built much beefier than need be, and as a result are heavy yet reliable. My advice is, if youa re not going to post treat your 4130 weldments, use mild steel instead. The 4130 will either fail before it's time if not stress relieved, or weigh a bunch more to assure durability. Probably both.
I prefer to build my roll cages out of 1026 DOM tubing because the lower carbon content does not require pre or post weld treatment, it can easily be repaired in the field, it is nearly 80% as strong as 4130 in the as welded condition, and is 20 % more ductile. That means that under a severe impact, such as an end over end roll, the mild steel tubing will deform a good deal more than the low alloy 4130 will, therefore absorbing more of the impact before failing.
On our new build, I will most likely be using a DOM tube for the main cage structure, and 4130 and 4140 on other selected components that see higher loads over a smaller area, such as spindles and a arms. As for repairing the 4130 Monster Mav roll cage damage, it' is MIG time baby, for the car is nearing the end of its reliable "service" life, my time is short, and the pig is overbuilt to the hilt anyway! I will however, cover the proper pre and post weld protocols in this thread when the new build begins.
Oh, and to answer tour question as to weight savings, I never paid close attention when TIG welding a chassis in the past, but I do know that it takes about 1/2 of a 33 lb. spool of .030" E70s-6 MIG wire to weld a complete truck chassis that is made from 1 3/4" x .120" wall tubing. Yeah, I know. That was years ago. I'm old school!
I cant believe that I didnt think about the HAZ(heat affected zone). I suppose I wanted the procedure to be ok. LOL in a perfect world. Although I think the weld itself would probably be fine I agree that a failure would occur in the HAZ. Oh well, was a thought, but thanks for the information on frame/cage building information. I have heard the exact reasoning before on deciding what material to build with... does the lighter more rigid material get the knod over the more malleable material that will deform before it breaks. I would really like to build my own chassis, everytime I see someone on here with the chassis jig. But not having any knowledge of what works with the UTV, Im afraid I would end up with an overbuild heavy chassis.
With a 1/16" filler wire, and an experienced hand on a torch with a foot pedal/thumb rheostat, I would expect to be able to cut half the weight of MIG welds with TIG. More controlled, and just enough filler added to a fusing weld to assure no undercut. But if you are building the frames for production, MIG is much faster and requires far less skill.
Look forward to hearing/seeing more of the ups and downs of the Monster mav chronicles.
badassmav
Well-Known Member
I cant believe that I didnt think about the HAZ(heat affected zone). I suppose I wanted the procedure to be ok. LOL in a perfect world. Although I think the weld itself would probably be fine I agree that a failure would occur in the HAZ. Oh well, was a thought, but thanks for the information on frame/cage building information. I have heard the exact reasoning before on deciding what material to build with... does the lighter more rigid material get the knod over the more malleable material that will deform before it breaks. I would really like to build my own chassis, everytime I see someone on here with the chassis jig. But not having any knowledge of what works with the UTV, Im afraid I would end up with an overbuild heavy chassis.
With a 1/16" filler wire, and an experienced hand on a torch with a foot pedal/thumb rheostat, I would expect to be able to cut half the weight of MIG welds with TIG. More controlled, and just enough filler added to a fusing weld to assure no undercut. But if you are building the frames for production, MIG is much faster and requires far less skill.
Look forward to hearing/seeing more of the ups and downs of the Monster mav chronicles.
I always got a finger activated remote switch when buying my TIG welders in the past. I never mastered the thumb controlled rheostat. Neither the rotating wheel, or the linear shaft type. They always seemed to force my "perch" or middle finger to hold the torch, forcing my clumsy ring finger to perform perching duties, whilst my index finger rolled the wheel.
What I did master though, was just a simple small push button remote that velcro'd onto the torch. Couple that with an inverter, or a square wave tig with programmable time and amperage slopes, and leave the lame foot pedal remote behind. That is the ticket. Once you get comfy using the dials on the machine to define the amperage and slope times, you can weld all day long in the monkey bars without aggrivation. Man that foot pedal would piss me off.
I remember in the early 80's, my brother and I were building stuff in the driveway, and we bought this new model welder from Hobart dubbed the " AC/DC TIG Combo".. We got the first one on the west coast. Cost a cool 5 g's, and weighed 514 pounds! It was a constant current power supply, and had a 60 amp plasma cutter, along with a 200 amp tig welder. We were the first guys around to own a plasma cutter (this was 30 years ago, mind you, and at the time, plasma machines were not "portable" in size. I believe Nassco had one that weighed in excess of 2,500 lbs.!It was a rectifier power source, with all analog potentiometers. It was the first time I saw or used a TIG with programmable heat and pre/post flow slopes. I actually used that machine to TIG up Mc Millins class 8 truck in '89.
Then, in '98, I bought a new Miller Dynasty inverter TIG package. They just came out, and only cost $3,700.00. The same machine, now sells for over 6k. That is one badass TIG. Weighed only 75lbs. or so, and could push 300 amps at 80% duty cycle.
I'll reminisce some more later, when I'm ready to lose more of my fans!!
motive
Active Member
I would really like to build my own chassis, everytime I see someone on here with the chassis jig. But not having any knowledge of what works with the UTV, Im afraid I would end up with an overbuild heavy chassis.
Proper tube placement is so much more important that what type of welding or steal you use. Turn every open square into a series of triangles and you can make a light and strong chassis. The corners of every triangle need to meet with a corner of another triangle as well or you will be feeding loads into the middle of a bar. There are a lot of "PRO" chassis as well as factory frames that leave large 4 sided openings that could be build lighter and stronger with smaller tubes properly placed.
megadesertdiesel
Well-Known Member
Proper tube placement is so much more important that what type of welding or steal you use. Turn every open square into a series of triangles and you can make a light and strong chassis. The corners of every triangle need to meet with a corner of another triangle as well or you will be feeding loads into the middle of a bar. There are a lot of "PRO" chassis as well as factory frames that leave large 4 sided openings that could be build lighter and stronger with smaller tubes properly placed.
hey thats the first thing i understand in these recent posts. I use the "no dead tube" way of thinking when i build stuff. As for all of the nerd welding specific talk, you guys are talking way over my head. I just have a Miller "squirt" gun and glue stuff together in my garage.
badassmav
Well-Known Member
Proper tube placement is so much more important that what type of welding or steal you use. Turn every open square into a series of triangles and you can make a light and strong chassis. The corners of every triangle need to meet with a corner of another triangle as well or you will be feeding loads into the middle of a bar. There are a lot of "PRO" chassis as well as factory frames that leave large 4 sided openings that could be build lighter and stronger with smaller tubes properly placed.
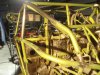
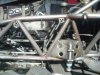
Thanks Zane. Now we're talking details. Important ones that lazy fabricators fall short on every time. I'll jump out onto my proverbial limb and say that more than 80% of the welded frames I see in contingency suffer from intersection design issues, and probably 1/2 of the TT's as well. Not only is it important to form triangles out of open 4-sided areas, it is equally as important that when you do, the joint is properly fit before welding. That being said, I'd like to take Zanes comment one point further, and discuss proper joint design.
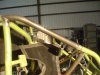
To demonstrate this, I took a picture of a truck in our shop that Marc had built on the outside a couple of years back. I processed the image in my diagnostic "windows paint" program (yeah, I'm being facetious again) to illustrate Zanes comments and my elaboration on them. Notice the red lines I added in the center of the tubes, and how when they connect at an intersection, they don't really connect. Instead of forming a triangle, as a first glance would indicate, the tubes, because of inaccurate placement, lazy fabrication disciplines, or whatever you want to label it as, form a different 4 or5-sided geometric shape such as a trapezoid.
It is important at this point to say that in a welded space frame, any type of triangle, be it equilateral or isosceles, only see's compression or tension loads, whereas any four (or more) sided shape introduces shear loads at the point of connection. Shear loads are what makes frames fail. When you see a frame broken where the diagonal supports are welded, more often than not it is broken because the fabricator did not properly position the diagonals to maintain a continuous line for the loads to transfer or travel through. The example I attached illustrates this point well. At first glance, it appears that the builder formed a triangle out of an open 4-sided area. But a triangle it is not! Because the median lines in the diagonal or "gusset" tubes do not share a common intersection where they join to the larger main frame tube, they introduce a bending load right where they attach. Now, instead of the load changing planes and carrying on through the tube frame, it shoots straight out at the point where the intersections did not connect and BAM, a lateral shear load is introduced right in the middle of a major load bearing tube. If the tube(s) was/were properly placed, the load would continue to follow a path through the axis of the space frame until it either joins another intersection, or terminates at a base plate or bulkhead.
This is why I am anxious to build from the ground up, removing all of the nonsense that the manufacturers burden their frames with. If, and only if you follow the disciplines of joint design, and the fundamentals of load tranfer, you can build a reliable frame much lighter than the stock one, and most likely, twice as rigid.
Oh shit, that was an hour and a half post
. I gotta work. More to follow, and thanks Zane for your contribution. Pleas feel free to openly correct me if I ever misrepresent the facts. After all, this is an educational thread, so accuracy is important. MDD and his "squirt gun"! Funny dude. You know your stuff, just not as perversely deep as us!Attachments
Proper tube placement is so much more important that what type of welding or steal you use. Turn every open square into a series of triangles and you can make a light and strong chassis. The corners of every triangle need to meet with a corner of another triangle as well or you will be feeding loads into the middle of a bar. There are a lot of "PRO" chassis as well as factory frames that leave large 4 sided openings that could be build lighter and stronger with smaller tubes properly placed.
Preach on!!!! Preach on!!!
Maybe someone will listen to you and or Reid, because they don't want to hear me!
I have been trying to explain this and have even pointed this out on a few builds on here, only to be looked at like an Ass Hole, as if I was knocking the guys build. Instead I was questioning things that I saw and would hope they would want to know about. I would then hope they would go back to their fabricator and ask about. Let the fab guy explain why he added dead tubes or did not add a tube at all. And some of these fab guys are looked at like they are the "Best in the UTV business".
I've seen UTV builds on here that I know if in a big endo, or if they were to get nerfed by a bigger heavier vehicle they are going to receive catastrophic damage. But as of late I have just bit my tongue as some are offended by my comments, and really why should I care?
badassmav
Well-Known Member
Take it from me, because I know this one! Challenging other peoples designs or products will always be met with some degree of resistance. More so for you than me because, as they say, "You don't have a dog in this fight". Just try to be a bit more diplomatic about your post(s). Don't dive right in to the deep end, rather ease into your point, citing examples, or first hand experience as justification for your comments. Present your post as being a helpful one, not judgmental. I have met you, and know your passion for our sport. The amount of knowledge that you posses is indicative of that fact. You embrace the sport way more than I ever will, and therefore are ambitious to the point that It may come across as forceful. I understand you completely, but others may not, so "post gently" as not to create nay-sayers, who will berate your every slip of the keyboard!Preach on!!!! Preach on!!!
Maybe someone will listen to you and or Reid, because they don't want to hear me!
I have been trying to explain this and have even pointed this out on a few builds on here, only to be looked at like an Ass Hole, as if I was knocking the guys build. Instead I was questioning things that I saw and would hope they would want to know about. I would then hope they would go back to their fabricator and ask about. Let the fab guy explain why he added dead tubes or did not add a tube at all. And some of these fab guys are looked at like they are the "Best in the UTV business".
I've seen UTV builds on here that I know if in a big endo, or if they were to get nerfed by a bigger heavier vehicle they are going to receive catastrophic damage. But as of late I have just bit my tongue as some are offended by my comments, and really why should I care?
Similar threads
- Replies
- 0
- Views
- 220