This is my first post on what I think is the BEST forum out there and I am happy to be here thanks JoeyD!!
<o> > </o>>
I will start by saying that this build was inspired by Jon’s (Crowdog) KOH build that is one sick machine!!! A little about me; I am a mechanical design engineer with a background in heavy equipment design and manufacturing but more resent (last 8 years) I have found myself in the medical field designing micro mechanical devices for surgical procedures to drug delivery. So with that said I have some knowledge and skill but by no means am I as skilled as some of you on here (wow).
<o>> </o>>
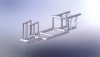
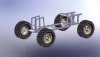
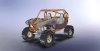
Build outline, this isn't a track racer (although that looks like a blast) its really more a rock crawler trail rig. So the chassis will be boated and dove tailed for that all important ground clearance. I am planning on widening it to get my seats as low as I can and stretch my suspension out (6inch long arm with a 3inch forward and back sweep). I will be doing all the work myself in my 2 car garage all basic hand tools but with one secret weapon, Solid Works. LOL
<o>> </o>>
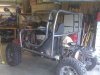
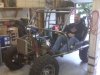
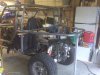
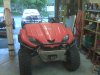
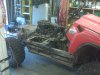
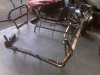
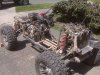
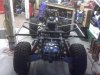
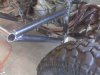
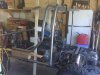
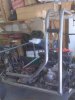
Here are a few pictures of the tear down. I have been working on this for a few weeks already so some of this is history…
<o>> </o>>
I hope you all enjoy I know I am!
<o>> </o>>
Cheers,
Brett
<o>
> </o>>I will start by saying that this build was inspired by Jon’s (Crowdog) KOH build that is one sick machine!!! A little about me; I am a mechanical design engineer with a background in heavy equipment design and manufacturing but more resent (last 8 years) I have found myself in the medical field designing micro mechanical devices for surgical procedures to drug delivery. So with that said I have some knowledge and skill but by no means am I as skilled as some of you on here (wow).
<o>
> </o>>Build outline, this isn't a track racer (although that looks like a blast) its really more a rock crawler trail rig. So the chassis will be boated and dove tailed for that all important ground clearance. I am planning on widening it to get my seats as low as I can and stretch my suspension out (6inch long arm with a 3inch forward and back sweep). I will be doing all the work myself in my 2 car garage all basic hand tools but with one secret weapon, Solid Works. LOL
<o>
> </o>>Here are a few pictures of the tear down. I have been working on this for a few weeks already so some of this is history…
<o>
> </o>>I hope you all enjoy I know I am!
<o>
> </o>>Cheers,
Brett

 ontGrowAutofit/> </w:Compatibility> <w:BrowserLevel>MicrosoftInternetExplorer4</w:BrowserLevel> </w:WordDocument> </xml><![endif]--><!--[if gte mso 9]><xml> <w:LatentStyles DefLockedState="false" LatentStyleCount="156"> </w:LatentStyles> </xml><![endif]--><style> <!-- /* Style Definitions */ p.MsoNormal, li.MsoNormal, div.MsoNormal {mso-style-parent:""; margin:0in; margin-bottom:.0001pt; mso-pagination:widow-orphan; font-size:12.0pt; font-family:"Times New Roman"; mso-fareast-font-family:"Times New Roman";} @page Section1 {size:8.5in 11.0in; margin:1.0in 1.25in 1.0in 1.25in; mso-header-margin:.5in; mso-footer-margin:.5in; mso-paper-source:0;} div.Section1 {page:Section1;} --> </style><!--[if gte mso 10]> <style> /* Style Definitions */ table.MsoNormalTable {mso-style-name:"Table Normal"; mso-tstyle-rowband-size:0; mso-tstyle-colband-size:0; mso-style-noshow:yes; mso-style-parent:""; mso-padding-alt:0in 5.4pt 0in 5.4pt; mso-para-margin:0in; mso-para-margin-bottom:.0001pt; mso-pagination:widow-orphan; font-size:10.0pt; font-family:"Times New Roman"; mso-ansi-language:#0400; mso-fareast-language:#0400; mso-bidi-language:#0400;} </style> <![endif]--> Thank you Darryl, I agree with you on the garage build and mag comment... I really envy those guys who can do the BIG buck builds but at the same time it sure is cool to say that 'I built it' it really makes it original and yours.