You are using an out of date browser. It may not display this or other websites correctly.
You should upgrade or use an alternative browser.
You should upgrade or use an alternative browser.
Ain't Your Daddy's UTV
- Thread starter ktm265
- Start date

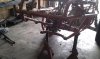
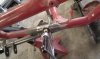
The tubing size is close to 1.25" but the wall thickness was a bit goofy in spots with some burn through in the joint. AJ wanted to do the splice where it could be reinforced and keep it stronger than the existing area. Installed some [COLOR=#fff200! important][COLOR=#fff200! important]slugs[/COLOR][/COLOR] and used 1-1/4 tubing...
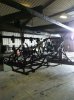
Slugs were 3/16" wall, welded the seam and plug welds of course. It's very handy how these stand up on end to work on.
Slugs were 3/16" wall, welded the seam and plug welds of course. It's very handy how these stand up on end to work on.
Attachments
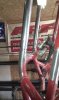
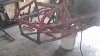
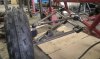
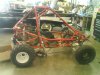
And then came the fun....with so many things to consider...camber, castor, bumpsteer and keeping all of these within limits along the arc of travel. And the fact that these arms are not designed for use on this frame...A LOT of fitting, measuring, re-fit, measure, check angles...re-fit...... All the while keeping it within 61" width...AJ shot for no more than 60".
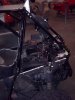
Since the stock metal is thinner on the upper a-arm mounts AJ used some .090 tubing cut in half to beef up the frame in the area he was going to put the mounts.
Since the stock metal is thinner on the upper a-arm mounts AJ used some .090 tubing cut in half to beef up the frame in the area he was going to put the mounts.
Attachments
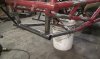
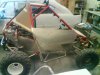
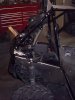
Tomorrow AJ will get the shocks mounted up. Will take the measured length of travel of the shocks and find the optimum position so it's using the full length of travel and keep the ride height close to stock.
Attachments
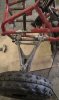
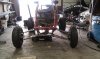
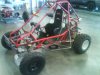
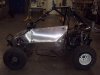
Couple of pictures of it... Now we are putting on a few finishing touches, moving a few attachment points for various little things...Once it's all done, we'll strip it down to the frame and off to the powder coater...
Attachments

Shake down report... Please let me start this off by 1st saying this... "IN YOUR FACE HOSER!!!" The front end modification that he was so critical about worked great... Still have some push but this was due to the rear end not having a differential...the suspension worked perfect, soaked up ruts, washouts, jumps and without wanting to jerk the controls out of my hands. In a stock Pilot, the steering gets sensitive at speed...not the case now, it smoothed out more as speed increased and wanted to track straight and not try to grab directions...at one point I was driving 1 handed with no problems...The different geometry of the Kawasaki front end and the addition of the GPR was the nats ass. To the guys that manufacture the LT suspension for these, junk the stock Honda hubs and go with the Kaw KFX700 hubs. This gives you disc brakes, uses the same tie-rod ends and has a different throw point for the tie-rod at the hub. I did add the GPR but had it set at it's lowest setting and it was more than enough...
Steering...still have some push but found by gasing the rear around, it could still turn fairly sharp...more weight in the front would help but at this point, not sure what I could shift forward and I don't want to add weight just to add weight...
Engine temp... Water temp never went about 190 and the fan wasn't kicking on....today was about perfect for temps, 80 outside temp today... This could change though with some jetting.
Now for what to change...need to re-jet. I have it close by the plug but it's still a little rich. Going to lean it out and drop down one more size on the main...It was starting out good but would bog down a little at mid range...I'm not the best at jetting so I have a friend who has driven 2 stroke motors for years. I also have to get more power for the lights...Anyone know of a high output stator for the FL400R? I bumped the light switches on and they drained the battery within 20 minutes...once I found out the problem, a turned the switches off, gave the pull starter a good pull and I was back on the track...Until I find a new stator, going to install a master power switch for all the extras...manage the power a little better. Finally the thumb throttle is really stiff...has good spring response so going to look for a lighter spring...
Overall I am very pleased with the results of the modifications...The aluminum body is going on, take it to the races this weekend for a good shake down run...barring any problems, Monday it will get stripped down and sent off for powder coat and the body will get some graphics for my sponsors...
I did shoot some video but I had MX helmet on with the visor and it kept hitting the camera...still cool video but it changed the shot so you couldn't see the controls...I'm adding some additional mounts for the Go-Pro. The suspension was very smooth and having it mounted to cage it really showed how smooth and how well the suspension worked.
Been a while since I updated... It's in the shop being pulled down for powder coating... Took it to a harescramble, had some heating issues when the switch to turn the fan on and off went out...other than that, ran great.
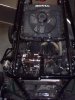
We raced with just the minimal body panels on so we could check on the vitals...
We raced with just the minimal body panels on so we could check on the vitals...
Attachments

Dropped the motor off with RPC tonight out of Palo IA...Dan and Brian are going to go through it. Decided to stick with the stocker and not do the CR500...If the CR500 upgrade blows on me, there is no replacement or going back...Monday I'll should hear back on how the 400 bore was looking...etc...and then build from there. Reality is I'm woods racing, I don't need tons of top end since you can only go so fast in the woods anyway... Rest of the body panels are done now, breather system for my helmet is completed, fan wired direct completed and the battery drain from all the lights has been rectified...Hopefully in within 2 weeks we should be putting it back together and send it off for a new skin on the body.
Flyingbryan
New Member
This looks like a fun project. L
ooking forward to new pictures.
Bryan
ooking forward to new pictures.
Bryan

RuggedRadios
Official UTVUnderground Communications Sponsor
So awesome! Nice looking build.
Similar threads
- Replies
- 33
- Views
- 16K
- Replies
- 5
- Views
- 5K
- Replies
- 0
- Views
- 1K